
Use the table of contents below to navigate to the exact steps to extract data from PDF files. If you require more specific instructions for various integrations, please see our detailed walk throughs on our support site
What is PDF?
PDF stands for Portable Document Format and was originally developed by Adobe in the 1990s to present richer documents than was available at the time, including the ability to add text formatting and images. The key difference however was for these documents to be presentable on any computer, independent of operating system.
John Warnock, one of the founders of Adobe, wrote: “Imagine being able to send full text and graphics documents (newspapers, magazine articles, technical manuals etc.) over electronic mail distribution networks. These documents could be viewed on any machine and any selected document could be printed locally. This capability would truly change the way information is managed.”
Today PDF is used as the basis of much communication between companies, systems and individuals. It is regarded as the standard for finalised versions of documents as it is not easily editable except in the case of fillable PDF forms. It is popularly used in exchanging information pertaining to invoices, price-lists, purchase orders, HR forms, bank statements and many other types of documents.
The sheer volume of information exchanged in PDF files means that the ability to extract data from PDF files easily and automatically is so important. Spending time extracting data from PDFs to input into third party systems can not only be very tedious, but also quite costly for a company.
Short History of PDF
One need to venture all the way back to 1991 at a Seybold conference in San Jose where Adobe initially spoke of a format which was back then referred to as “IPS”, which stood for “Interchange PostScript”. Version 1 was however only released in 1992 and the tools to actually create and view PDF files, Adobe Acrobat, was only released in 1993.
The very first version only featured internal links (for Adobe only), RGB color space only and a few font types.
Unfortunately PDFs came at a steep price back then. Acrobat Distiller, the software which Adobe produced in order to convert Postscript documents to PDF, was available in two versions at the time:
• Personal ($695)
• Network ($2,495)
Acrobat Reader, the software required to read PDFs, cost $50. These costs meant that PDF as a format wasn’t an overnight success. Adobe released version 2 in 1994 and this featured numerous upgrades including:
• External links
• Article threads
• Security features
• Device independent color
• Notes
It wasn’t however until the US tax department started distributing tax forms in PDF that the world begun to take notice of the PDF format.
Technical hurdles to extract data from PDF
There are a few reasons why extracting data from PDF files is harder than one might think. This is because PDF files are really about presentation and not about the internal structure.
Unlike HTML, XML or JSON, PDF doesn’t contain any internal nodes which dictate a structure at all. PDF has primarily been designed for presentation instead of for further editing. In the event that you use a word processor or spreadsheet (Microsoft Word or Excel), or even a presentation tool like Microsoft PowerPoint to export to PDF, the document is exported as a graphical representation of the original document. However, the underlying structure is either partially or even completely lost. Therefore, when you go about converting to PDF, bare in mind that creating a PDF is not necessarily a reversible process.
At Parserr we are able to use a coordinate-based system and maintain aspect ratio. We use this to extract the data you require by maintainining a basic ratio constant between the text in the PDF and therefore extract the content you require, at the position you require. You do this by using our cropper tool to show us exactly where that data may be:

Why Extract Data from PDF?
As PDF has become the accepted medium for data exchange, so the need to not only read PDFs, but also to extract from PDFs, has become more critical to business operations.
Once receiving a PDF, either via email, or download, companies typically use the data in the PDF to input into their 3rd party systems. In the past this has required manual extraction and data input into that system. But the world has moved on into an increasingly automated world and now systems like Parserr are available to automate this tedious process. Below we explore some of your existing options to extract data from PDF.
Extract data from PDF manually
If you’re receiving just a few PDFs every month, it may be worth just opening up the PDF and then manually copying the data from the PDF into the system or program you desire.
This is probably costing your business more than you think!
Well let’s do a little math together. Let’s assume that you decide that someone in the team should do it. Let’s also assume that:
• $60,000 salary (US Median wage)
• 6 PDF documents every month
• 8 minutes to enter the data into the third party system
• 2 minutes to check the data into the third party system
(I won’t include the 23 minutes and 15 seconds it takes to refocus once someone is distracted!)
TOTAL: 1 HOUR = $29
Parserr is totally FREE for your first 10 documents per month!
Extract data from PDF using Outsourced Services
Perhaps your company has taken the approach of outsourcing these services to countries where the median wage may be lower. In fact there are many websites online that provide this exact service. Companies like Upwork.com, Freelancer.com. There are also dedicated companies based in the US (and Australia, UK etc) that employ many data entry clerks in those countries (India, Pakistan, Phillipines etc). The upside is they can take care of the requirement for you and essentially parallelize your workflow:
This may drastically reduce your costs but has some downsides such as the human error factor. These clerks are really incentivized by quantity, not quality. Its not their document after all, and this can lead to some careless errors. We at Parserr have been down that road! The other issue really lies in the data integrity and security. Are you happy for that information to be exposed and captured elsewhere?
So to summarize…
The pros include:
• Cost reduction
• Potential speed gains
The cons include:
• Human error
• Security risk
Extract data from PDF automatically
This is where it really gets interesting!
If you’re receiving any more than 5 of the same PDF documents per month and outsourcing the PDF data extraction, or worse yet, asking your employees or colleagues to do it, then you’re in all likelihood wasting resources.
If you work in a human resources, purchasing, accounting or administrative role, you’re probably very familiar with compiling information from at least one the following documents:
• Invoices & receipts
• Purchase & sales orders
• Shipping & delivery orders
• Bank statements
• Weekly & monthly reports
• Employee forms
Extracting data from these PDF forms and scanned documents into a usable format is probably one of the basic requirements of your job, and one of the most frustrating.
But in today’s world of automation technology and instant gratification, you shouldn’t have to do that anymore. And you don’t have to!
Not only can you automate this process for a batch of documents, you can set it up so that you’ll never have to do it for similar documents in the future. With Parserr, you simply send an email, and the rest of the work is done for you.
Ready to learn how? Let’s get started! If you’re looking for more specific examples for exact steps for integrations such as Salesforce, Excel or Dynamics 365, please see our support app
Step 1: Sign up for Parserr
Parserr’s goal is to help you automate your business and eliminate unnecessary manual data entry through email and document parsing. To get started, simply head to our homepage, enter your email and we’ll walk you through the rest.
Step 2: Send an email with your sample PDF attached
Once you’ve registered, you’ll be taken to a screen showing a randomly-generated email address unique to your account.

Parserr is primarily email parsing software, therefore uploading documents is done via email. Use your preferred email client to send an email, with your sample document attached, to your account. Once it’s sent, Parserr will detect it automatically and move you to the next stage.
The document you attach now will only be used as a sample. You’ll need to re-upload it at the end of this process, if you’d like to parse it as well as others.
Step 3: Tell Parserr what you plan to do
Parserr allows you to export the data it parses in many ways. Along with a standard Excel or CSV format, you can also connect Parserr with Zapier to give you an even wider range of options for export, such as Google Sheets, MailChimp, Google Calendar and Slack.
To facilitate a smoother process, Parserr will ask what part of the email you would like to extract from and what third party application you’ll be extracting to. Simply choose your reply from the dropdown menu options provided and click “Next” to move on.
One of the most common ways users compile parsed data is via a spreadsheet, so we’re showing you how to compile the data from your parsed PDFs into a Google Sheets spreadsheet.
Step 4: Add your first rule
Next, you’ll be taken to the Rules section, where you’ll be setting your first rule. First, select the Attachment attribute. This tells Parserr that you’ll be parsing data from your email attachment, not the body of the email itself.

Scroll down and click the plus sign to add your rule. You’ll see a pop-up window, asking you to select the type of Rule you wish to set. Choose Files as the rule category, and select “Extract single line of text from PDF”, as shown below. The other option for PDF files is to extract all the text from a single page or all pages of your document.

Next, you’ll be taken to a page showing your document. We’re using an invoice for this example.
Draw a rectangle over the data you wish to capture. Notice in this example, it’s highlighted right after “Invoice #” because that’s where the Invoice number will appear on every invoice from this company.
Then we give the selection a name below, and click “Confirm selection.”

You’ll then be taken to the previous page, which will be updated with the parsed data and the Rule name. Verify its accuracy and click “Save Rule.”

Your saved rule will now look like the below image on the Rules tab. From here, you can edit the rule, duplicate it or delete it.
We could move forward to the next stage of parsing with this, but that’s if we only require one piece of data from each PDF document. Chances are, you’ll also have other data that you wish to capture.

To add more Rules for capturing data, simply click the “Add Rule” button and repeat this step as many times as needed, until you’ve made a Rule for each line or page of data you wish to capture.
Below, we have created three rules for the three items we want to capture from our invoices – invoice number, the total amount due and the due date.

Now, we’re just about ready for parsing, but we need to do one last thing…
Step 5: Set up your third-party application
Remember, in Step 3, where we chose to export our parsed data to Google Sheets? Well it’s time to set up that spreadsheet before we proceed. (Note: What you choose at the beginning of this process will determine the instructions given at this stage and whether you’ll need to create a new file. Some will require this step, and others will not.
In a separate tab (keeping Parserr open), go to the third-party application and create a new file. In the case of Google Sheets, you can add headings corresponding with the Rule Names you’ve listed in Parserr. Here’s our sample sheet before parsing.

Now, let’s get back to Parserr to complete the third party integration and parse our data.
Step 6: Integrate your third party application account
At the top of the Rules screen (where we left off), you will see a prompt to send your data to the integration tool you’ve chosen. Click the link, then log into or set up your account and connect it to Parserr. In some cases, Parserr will pull in the most recent files on that account and ask which you’d like to use to store your data.
As shown below with Google Sheets, Parserr allows me to select the spreadsheet and worksheet. Additionally, it allows me to map the Parserr Rule Name to the Google Sheets column headings that I just created.
Once this is complete, you can click “Save changes” and we’ll move on to the final step, parsing your data and exporting it directly to your third party tool!

Step 7: Parse your data!
It’s time! The final thing you need to do is to send an email to your Parserr email that you used earlier. (If you ever forget it, it’s always at the top right of your screen in Parserr.)
Parserr will then process your email automatically and send the data straight to your third party application. Here’s the same Google Sheet from above, that has been automatically updated with an email we sent to Parserr.

And there you have it!
For each additional PDF file you have, simply email it and Parserr will take care of the rest.
Bonus: Automate the whole process
If you really want to automate this process entirely, you can set up auto-forwarding in your respective email accounts, that will forward any email you specify to your Parserr inbox, without you ever getting involved. You literally won’t have to lift a finger!
Here are the auto-forwarding instructions for GMail, Yahoo and Outlook.
Now it’s your turn!
Ready to give Parserr a test run Set up your free account right now and use this guide to help you get started with extracting data from your PDFs.
Or if you want to eliminate all that, simply contact us once you’ve registered your account and we’ll set things up for you. You can get back to business and leave the boring and mundane PDF parsing to us. After all, we’re really good at it.
Extract Data from PDF to 3rd Party Integrations
Using Parserr to automate the extraction of your data from your PDF is as you have seen above quite a liberating process. It is one less process you have to manually assign resources to in your business.
But once you have extracted your data from your PDF files, where exactly can it go? Well the answer to that is “to over 1000 3rd party applications”. We will cover some of the main applications below, but you can find many more applications of these integrations on our support site.
Extract data from PDF to Excel
One of our most popular integrations is extracting data to Excel. Once it is in a spreadsheet, the data is easy to manipulate and potentially even use it to upload to third party systems.
In order to set this scenario up you will need to signup for a new account
1. Make sure the first email you send to Parserr contains the PDF you would like to extract from:

2. In the onboarding steps, make sure you answer the questions correctly as this will help you attain the maximum amount of value from Parserr

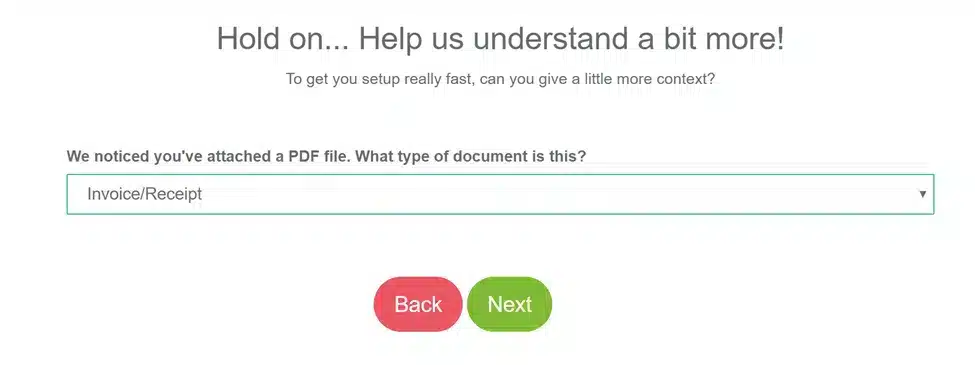
3. Let us know what type of document you are extracting. We have various options enabled (eg. Automated Invoice extraction) in the case of invoices:
4. If you are wanting to extract to an exportable Excel or CSV sheet, then choosing the following option is fine. If you are wanting to extract to an Excel document located in Onedrive or Google Sheets, then go to step 5

5. If you are wanting to extract to Google Sheets or Onedrive or an Excel document located in SharePoint for instance, then choose the correct integration as listed below:

6. Once you are finished the onboarding process, Parserr will take you through the process of adding rules. This will be the opportunity to extract the exact content you require from the PDF files. Remember this is just a sample email, but it should contain the PDF you require to extract content from. Choose “Attachments” below:

7. Remember to click the big green plus sign halfway down the page to add your parsing rules in. This will get you started on extracting the exact content you need:

8. Choose the “Files” category from the dropdown:

9. There are a few options for extracting text from the PDF now.
• Extract Page Text from PDF – This option allows you to extract all the page text within the PDF document. You can then use subsequent rules to hone in on the exact data you need. This feature is very handy if you can extract out the content you don’t need systemically. It also works well when the PDF data may not always been in the same position in the PDF.
• Extract single line of text from PDF – This option allows you to use Parserr’s built in UI tool to select the exact text you require within a fixed position within the PDF. This option works well if the content you require ALWAYS falls in the same position within the PDF.For the purposes of this guide, we will use the Extract single line of text from PDF
10. Selecting the rule will redirect you to a new page where you will be able to use the cropper tool to extract the exact data you require from the PDF. Give your rule a name and click the “Confirm selection” button:

11. Parserr will redirect you back to the rules page where you should see the content you require extracted from the PDF. Extracting data from PDF is not a perfect process. At times there will be some characters which are present in the extraction which need to be removed. Adding subsequent rules steps to your rules will assist in this. In the case below we have a few newline symbols on the end of the text:

12. Add subsequent steps as needed. In our case we added the search & replace function in order to remove the newline constants:

13. Save your rule (green button at the bottom of the page) and begin to create other rules in order to extract all the content you need. To add new rules click the “Add rule” button:

14. For our next rule, we will use the Extract Page Text from PDF rule in order to extract all the page text. We will then use Parserr’s other rules to extract the exact content required by simply eliminating the content we don’t need. Let us extract the “Permanent residence address” from the PDF:

15. Once you have completed extracting data from PDF, then head over to the “Export” section (check the side navigation) where you will be to download the extracted content in an Excel document:

16. Choose to download “All data” and click the “Download Now” button. This will process the download and send it over to your email.
17. The email arriving in your inbox will contain the exported data: