As a business owner, you’ll need all the automation tools you can get to streamline your processes.
Taking care of paperwork, for example, can take hours if not days — depending on the scale of your business — to handle.
Much of this time is spent manually extracting pertinent information from documents, be it a tax report, invoice, HR documents, and other legal forms. That’s hours of productivity burnt on an activity that’s tedious and prone to human error.
Fortunately, the internet never runs out of solutions that can help businesses achieve higher levels of efficiency.
For example, rather than traditional email clients, you may use cloud-based business collaboration tools like Microsoft SharePoint to streamline document sharing and task management across your organization. Still, you’ll have to go through the time-consuming process of manually copying the information found in your documents.
Automate PDF Data Extraction with Parserr
With Parserr, data extraction from such documents can be put on autopilot.
How Do You Extract PDF Data with Parserr?
Here’s how it’s done:
Preparing your Parserr Account to Handle PDF Documents
Parserr kicks off with a unique configuration process where you can pre-plan how you’ll use the platform.
Step 1: Send a PDF Attachment via Email
Since we want to extract information from printed documents, which will be scanned and sent via email, we need to prompt Parserr that we’ll use PDF documents. The easiest way to do this is to send a sample email that contains a PDF attachment to your Parserr inbox address, which will be displayed in the next step.

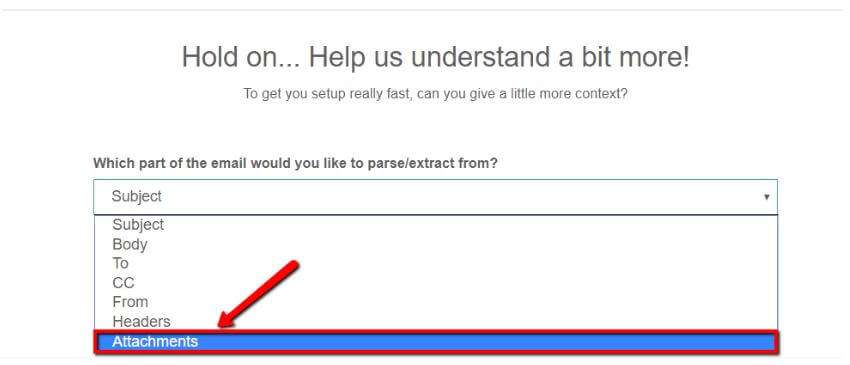
Step 2: In Parserr, Select Parse “Attachments” from the Drop Down Menu
Upon sending, wait for the site to refresh the page and choose “Attachments” when asked which part of the email must be parsed. You can view your options by expanding the drop-down menu.
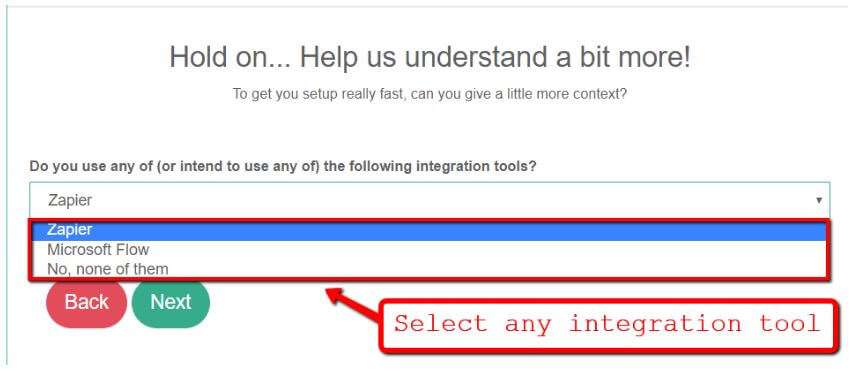
Step 3: Choose Your Integration Method – Zapier or Microsoft Flow
On the next page, you will be asked to select one of two of the available integration tools — namely Zapier and Microsoft Flow.
Note: Your Can Always Switch Integrations
It’s worth noting that either choice won’t restrict you from switching integrations at any point in the future. If you are unfamiliar with either and prefer to learn them along the way, feel free to choose “No, none of them” and click “Next.”
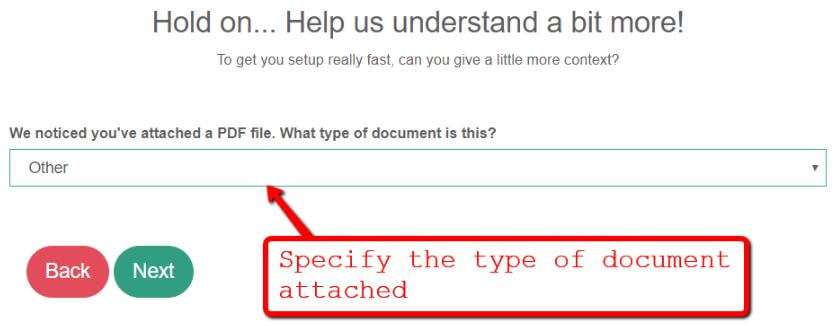
Step 4: Specify the Type of Document to be Parsed
Parserr should immediately detect an attachment in the sample email you sent earlier. You just need to specify the type of document attached to make your experience more streamlined as you use the tool.
PDF Document Types
In the current version of Parserr, the choices are as follows:
- Invoice/Receipt PDFs
- HR document PDFs
- Purchase/Sales Order PDFs
- Shipping and delivery orders PDFs
- Bank statements PDFs
- Other Accounting / Number Based PDFs
Example: How To Parse Information from a W-9 IRS PDF Form
For the sake of this guide, we’ll use the W-9 Request for Taxpayer Identification Number and Certification form from the Internal Revenue Service. In which case, we’ll have to use “Other” for now.
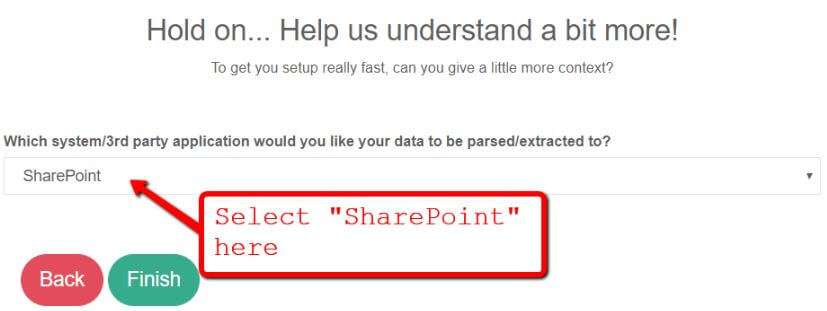
The next step is to specify the third-party application that will receive the data you’ll parse. This is important in order to export the information in a format that can be seamlessly imported.
Go ahead and select “SharePoint” to complete this step and finish the Quick Setup.
How to Create the Parsing Rules for PDF Data Extraction
Parserr will automatically take you to the “Rules” page of your account where you can start defining how the data will be extracted from your email.
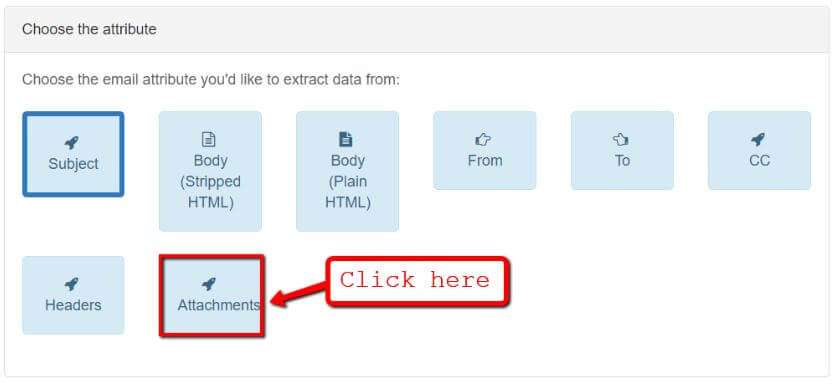
Step 1: Select the Email Attachment that Contains the Data You Want
The first order of business is to select the part or “email attribute” that contains the data. Just like before, select “Attachments” and wait for the page to reload.
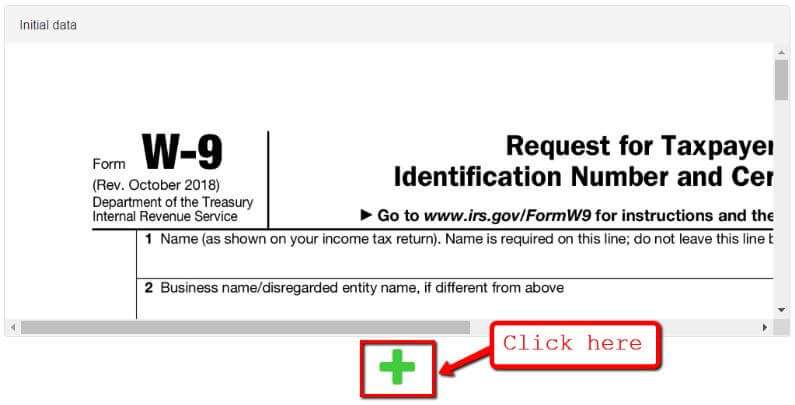
Step 2: Select the Green “Plus” (+) Button to Bring up the Rules Window
On the “Initial data” field, you should see a preview of the document you attached in your sample email. You can begin the extraction of data by clicking the green “plus” button, which will bring up the rules window.
Step 3: Select the “Files” Option to Start Extracting Information From A PDF
Since you specified to pull information from the email’s attachment, you should only see one option in the “Rule category” drop-down menu. Simply click “Files” to start defining how Parserr will extract information from the PDF document.
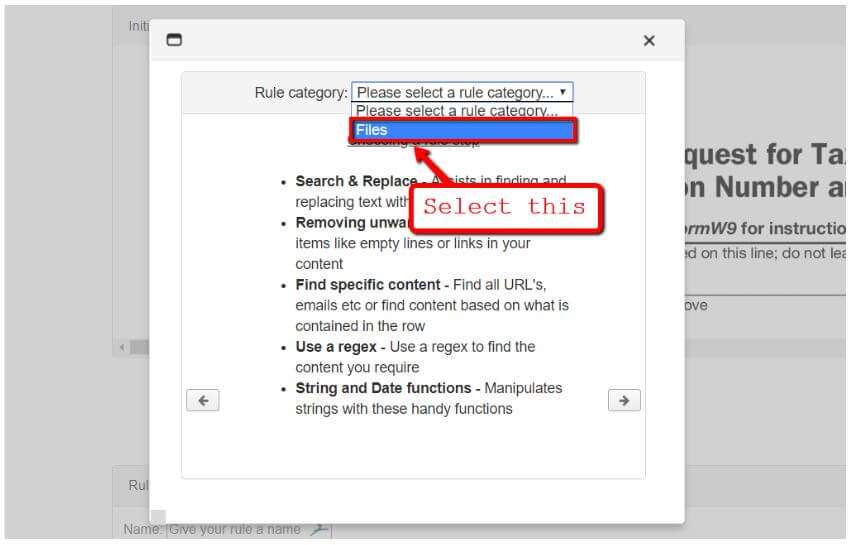
At this point, you will be presented with a list of “rule steps” that pertain to different ways of extracting data from the attachment.
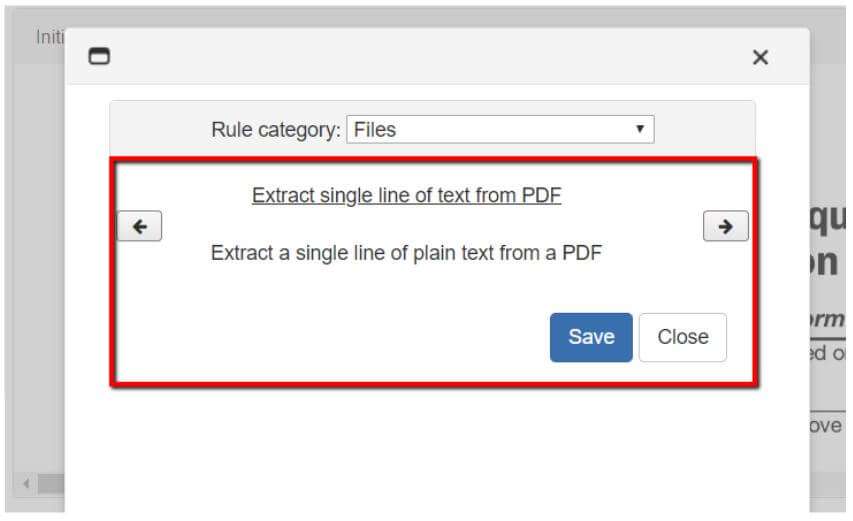
Step 4: Use the “Arrow” Buttons to Extract Single Line Items From A PDF
To extract only specific areas of the PDF document with the data you need, use the arrow buttons to find the rule step called “Extract single line of text from PDF.” This will enable you to manually highlight the section of the document you need to parse.
Step 5: Use the Drag-and-Drop PDF Extractor to Select Information
Parserr will then launch the drag-and-drop PDF Extractor tool. To use it, simply move the selection box over the text you want to extract, assign a name for that element, and click “Confirm selection.”
Here’s how you can use the PDF Extractor tool to obtain the name from the W-9 form we used in the sample earlier.
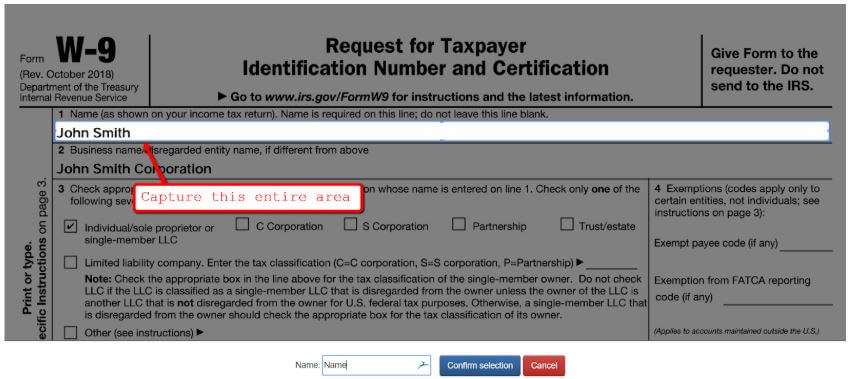
When highlighting the area where Parserr will scan for text, be sure to cover the entire text field — not just the area that contains text in your sample. This will allow you to reuse the same rule for other emails where the entries may contain more characters.
Now that you know how to parse data from PDF documents, all you have to do is repeat the steps above to create parsing rules for every piece of information you need. You can create a parsing rule for the address, social security number, and so on.
As long as future attachments follow the same layout as your sample email, Parserr should be able to automatically identify what information to acquire.
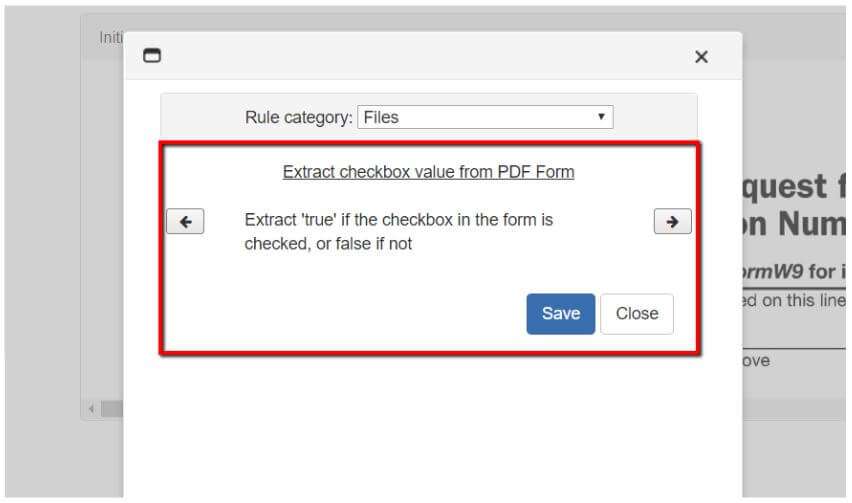
Extract Checkbox Values in PDF forms
You can also extract checkbox values using the “Extract checkbox value from PDF form” parsing rule step in case you handling comprehensive forms that include them.
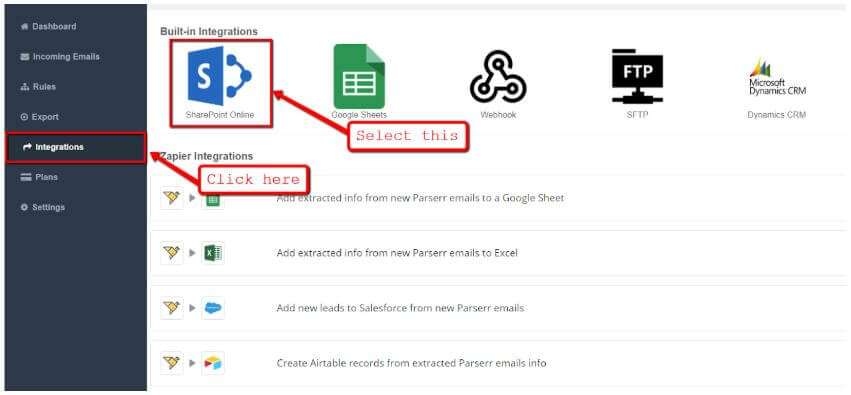
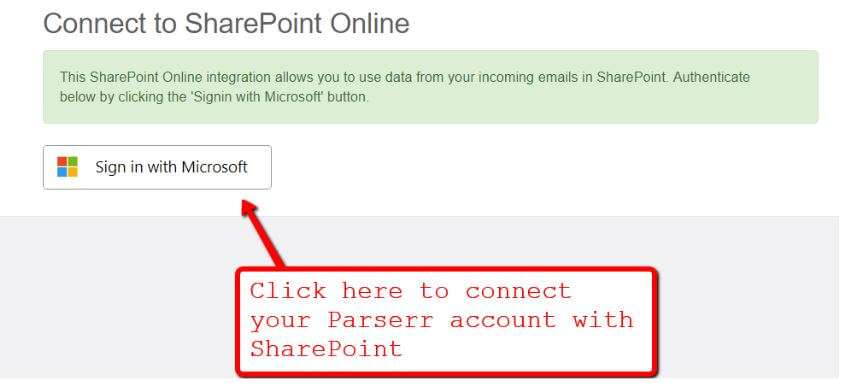
If you configured your Parserr account right and specified SharePoint as your third-party application, you can easily send data using the built-in SharePoint Online integration. This can be found on the “Integrations” page from your Parserr dashboard.
The only thing left to do is to sign in to your Microsoft account by clicking “Sign in with Microsoft.”
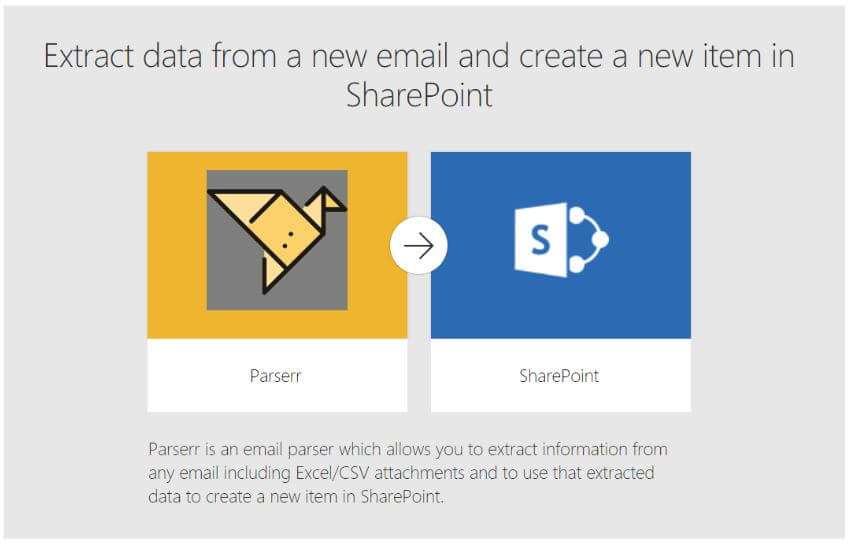
Since SharePoint is a well-recognized team collaboration app, you can also use other integration tools to transmit your Parserr data.
For example, you can use the following template from Microsoft Flow to automatically use your Parserr data to create a new item.
Conclusion
That’s it — what you need to know in order to parse data from HR and other business documents to SharePoint.
Parserr takes pride in having a smooth learning curve for absolute beginners. A quick tour of the tool through the free trial for existing SharePoint users should help you learn the fundamentals of setting up your own parsing rules.